Technical Support
Sunday, September 24, 2017
Wednesday, July 6, 2016
pst file location
Microsoft Outlook .pst file location
What is .pst or .ost file ?
When you use Microsoft Outlook, your email messages, calendar, tasks, and other items are saved on a mail server, on your computer, or both. Outlook items that are saved on your computer, are kept in an Outlook Data File (.pst and .ost).
Making regular backups of your pst-file(s) is always a good thing, not just when upgrading
In theory, your pst-files could be located almost anywhere on your computer but there are of course a couple of default locations in which to look. Also, as long as your computer is still in a functioning state, you can look up where your pst-files are located even when Outlook itself is no longer functioning.
Look up location within Outlook
Assuming your computer is still working as it should now, you can look up the location of your pst-files in Outlook in the following way:
Outlook 2007 and previous
File-> Data File Management…
Outlook 2010, Outlook 2013 and Outlook 2016
File-> Account Settings-> Account Settings-> tab: Data Files

Click on the “Open File Location…” button to be directly taken to the location of that pst-file. (Click on the image to see the full dialog)
Note 1: For detailed instructions about backing up and restoring Outlook data see: How to take outlook backup
Note 2: The pst-files that belong to IMAP accounts are only just a cache of your online IMAP mailbox and doesn’t necessarily need to be backed up. See below for more details.
Look up location via Mail applet in Control Panel
If you can’t open Outlook anymore, you can look up the location via the Mail applet in Control Panel.
When you open that, you’ll see a “Data Files…” button which displays the same overview as you would get via above instructions in Outlook.
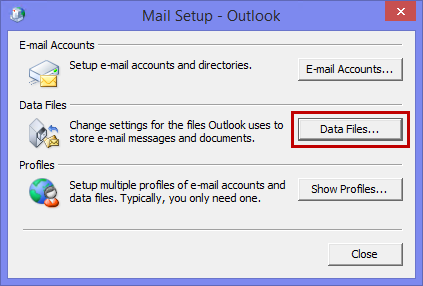
Accessing the list of data files without opening Outlook via the Mail applet.
Multiple Mail Profiles
When you have multiple mail profile configured for Outlook, you don’t necessarily need to restart Outlook in each mail profile to look up the locations for your pst-files.
Instead, open the Mail applet from the Control Panel just as indicated above and click on the Show Profiles… button, select a mail profile and then on the Properties to get to see the Data Files button for that mail profile just as explained above.

Don’t forget the pst-files of any other mail profile you might have.
Default locations
Checking the default locations in addition to the above methods is always recommended as there might be some disconnected pst-files which you might have forgotten about but still like to keep anyway.
The default locations to check are:
C:\Users\%username%\AppData\Local\Microsoft\Outlook\
C:\Users\%username%\Documents\Outlook Files\
If you are still on Windows XP or previous, check the following locations:
C:\Documents and Settings\%username%\Local Settings\Application Data\Microsoft\Outlook\
C:\Documents and Settings\%username%\My Documents\Outlook Files\
Pst-file cache, ost-files and “Not available”
 Up until Outlook 2010, pst-files were also used by IMAP accounts to cache and sync the mail folders with the IMAP mail servers. When this pst-file is lost, Outlook will rebuild it (by redownloading the emails) the next time that you start Outlook or configure the account on a new machine.
Ost-files are also just a cache of your online mailbox unless they are associated with an IMAP account in Outlook 2013 or Outlook 2016.
The “Not available” listing for Outlook Hotmail Connector accounts in Outlook 2003, 2007 and 2010 is normal. These actually point to ost-files as well and don’t need to backed up either.
In the case of Exchange and Outlook.com/Hotmail accounts, you’d simply reconfigure your account in Outlook and it will rebuild the ost-file cache from your online mailbox.
Look up location via Mail applet in Control Panel
If you can’t open Outlook anymore, you can look up the location via the Mail applet in Control Panel.
When you open that, you’ll see a “Data Files…” button which displays the same overview as you would get via above instructions in Outlook.

Accessing the list of data files without opening Outlook via the Mail applet.
Multiple Mail Profiles
When you have multiple mail profile configured for Outlook, you don’t necessarily need to restart Outlook in each mail profile to look up the locations for your pst-files.
Instead, open the Mail applet from the Control Panel just as indicated above and click on the Show Profiles… button, select a mail profile and then on the Properties to get to see the Data Files button for that mail profile just as explained above.

Don’t forget the pst-files of any other mail profile you might have.
Default locations
Checking the default locations in addition to the above methods is always recommended as there might be some disconnected pst-files which you might have forgotten about but still like to keep anyway.
The default locations to check are:
C:\Users\%username%\AppData\Local\Microsoft\Outlook\
C:\Users\%username%\Documents\Outlook Files\
If you are still on Windows XP or previous, check the following locations:
C:\Documents and Settings\%username%\Local Settings\Application Data\Microsoft\Outlook\
C:\Documents and Settings\%username%\My Documents\Outlook Files\
Pst-file cache, ost-files and “Not available”
 Up until Outlook 2010, pst-files were also used by IMAP accounts to cache and sync the mail folders with the IMAP mail servers. When this pst-file is lost, Outlook will rebuild it (by redownloading the emails) the next time that you start Outlook or configure the account on a new machine.
Ost-files are also just a cache of your online mailbox unless they are associated with an IMAP account in Outlook 2013 or Outlook 2016.
The “Not available” listing for Outlook Hotmail Connector accounts in Outlook 2003, 2007 and 2010 is normal. These actually point to ost-files as well and don’t need to backed up either.
In the case of Exchange and Outlook.com/Hotmail accounts, you’d simply reconfigure your account in Outlook and it will rebuild the ost-file cache from your online mailbox.
How to take outlook backup
Microsoft Outlook 2013
If you are using email for work, you are most likely using an Exchange or IMAP account. Exchange and IMAP servers automatically archive your email so that you can access it anytime or anywhere. If you have an Exchange account, check with your admin about how to access your archived email.
If you want to back up the message folders locally (in addition to keeping them on the server), you can automatically move or delete older items with AutoArchive or export the items to a .pst file that you can restore later as needed and use by importing.
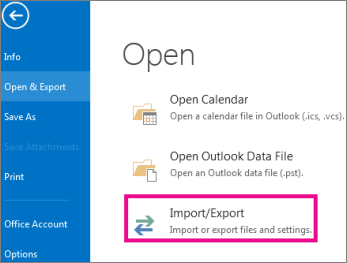
- Select File > Open & Export > Import/Export.
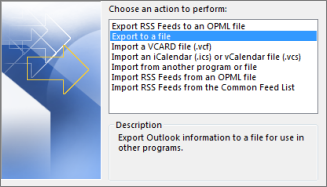
- Select Export to a file, and then select Next.
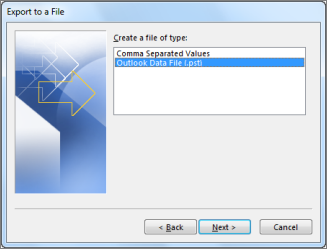
- Select Outlook Data File (.pst), and select Next.
- Select the mail folder you want to back up and select Next.
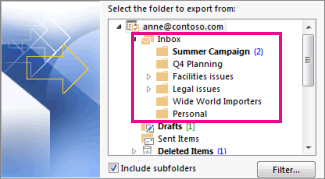
- Choose a location and name for your backup file, and then select Finish.

- If you want to ensure no one has access to your files, enter and confirm a password, and then select OK.
The messages that you keep in a .pst file are no different from other messages. You can forward, reply, or search through the stored messages as you do with other messages.
Friday, May 13, 2016
How To reset windows 7 password without password reset disc
Forgot Windows 7 password?
Or, did someone else who used your computer change the login password? In both cases, you’re helpless if you do not have any Windows 7 password reset disk. The only option left for you is to install the operating system again. As it requires formatting, you’ll loose all your data saved at your hard disk. This article is about How to Reset Windows 7 Password without reinstalling the OS.
You need to keep your patience during this Windows 7 password reset process. Some steps need lot of time and you have to just wait and wait.How to Reset Windows 7 PasswordPower on the computer and the Windows 7 should start. When it displays “Starting Windows” long press the power button to force the system shutdown. Windows 7 will treat this as a start up fault and try to recover from the error. Don’t worry! We’re moving rightly according to our planning.
Step One: Restart your computer and you should get into the Error Recovery window. Select the ‘Launch Startup Repair (Recommended)’ option and hit ‘Enter’.

The startup repair wizard appears and the system starts checking for the problem.

Step Two: As there is no real problem, it can’t find any solution and suggests to use system restore. But, we are not going to use it. Click the ‘Cancel’ button.

Step Three: The Windows 7 attempts to repair the problems automatically. This takes several minutes. So, wait and wait. As there is no problem, Windows will end up with a message stating that “Startup Repair cannot repair this computer automatically”. Now click the button as shown in the picture below to view the problem details.

Step Four: Scroll down to the end of the problem details section and click the link to read the local privacy statement as shown in the picture.

This opens the local privacy statement into a notepad document. You’re not going to read the privacy statement any way. What you need is to search and open some system files using the notepad.

Step Five: Select File > Open from the notepad menu bar.

Step Six: The ‘Open’ dialog window appears. Select ‘Local Disk’ from the ‘Look in’ drop-down menu.

Step Seven: Now go to the Windows > System32 folder and change the file type to ‘All Files’.

Step Eight: Find out the file named as sethc, select it and press the F2 key to rename the file. Give the name as sethc_bak.

Step Nine: Similarly, search for the application file named cmd at the same location. Once found, right-click on it and select ‘Copy’. Now, right-click on an empty space and select ‘Paste’. Another file named as cmd – Copy is created at the same location.

Step Ten: Rename the file ‘cmd – Copy’ to sethc.

Step Eleven: Once done, cancel all the opened windows and finally click the ‘Finish’ button at the ‘Startup Repair’ dialog window.

Step Twelve: Your computer will reboot as usual and the log-in screen will appear. Press the ‘Shift’ key for five times. Voila! The command prompt opens without getting logged into the system. Now you can use this command prompt to reset Windows 7 password.

Reset Windows 7 Password using the Command Prompt
Now you are a step away from resetting the password in Windows 7. At first run the following command to see the exact user names at the computer.
net user
This will show the list of users in the computer. Choose the username for which you want to reset the password.

Now run the following command to reset the password.
net user <user_name> *
Replace the <user_name> with your own. Type your new password and retype it to confirm.

You’ve successfully reset Windows 7 password without any Windows 7 password reset disk. You can now log into the Windows 7 system with the user name and the new password.
Note: After logging in, you would want to get back the original sethc file. Repeat Step One to Step Seven, delete the “sethc” file and rename “sethc_bak” to “sethc”. It will not make any change into the Windows 7 password reset task.
Tuesday, January 26, 2016
Gmail incoming outgoing server setting
Standard configuration instructions:
| Incoming Mail (POP3) Server - requires SSL: | pop.gmail.com Use SSL: Yes Port: 995 |
| Outgoing Mail (SMTP) Server - requires TLS3 or SSL: | smtp.gmail.com (use authentication) Use Authentication: Yes Port for TLS/STARTTLS: 587 Port for SSL: 465 |
| Account Name: | your full email address (including @gmail.com or @your_domain.com) |
| Email Address: | your email address (username@gmail.com or username@your_domain.com) |
| Password: | your Gmail password |
100 MB Partition creation issue during installing windows 7
[Fixed] “Setup was unable to create a new system partition or locate an existing system partition” during installing Windows Vista, 7, 8, 8.1 from USB
If you try to install any version of Windows from USB flash drive you may got this error: “Setup was unable to create a new system partition or locate an existing system partition”
I have found solution that will be suitable for any Windows version.
Basically you just need to copy all installation files from USB flash drive to your HDD (or SSD) drive and make it boot able, and then continue installation from HDD to HDD
Step by step instruction:
- Boot windows installation from USB drive
- Press Shift+F10
- In console type diskpart.exe and press enter. In this program execute following:
- select disk=0. Disk 0 is your destination drive, so be careful, all information on this drive will be removed.
- create partition primary size=xxx, where xxx – is the size of new partition
- select partition=1
- active
- format fs=ntfs quick
- assign
- exit, now you have bootable drive C
- Navigate to USB flash drive, in my case: cd d:
- Copy all files from USB drive to C: drive: xcopy d: c: /e /h /k
- Go to boot folder: cd boot
- Make you C: drive bootable with following command: bootsect /nt60 c:
- Put off USB drive from computer and restart them.
- Install Windows
- Remove unnecessary menu item from bootscreen:
- Run cmd.exe as Administrator
- See boot menu list bcdedit
- Find Windows Setup and copy identifier
- Run bcdedit /delete {identifier}
Subscribe to:
Comments (Atom)